

HJ: This is a very interesting series of yoga poses designed to balance your mind and body based on ancient, sacred Tibetan teachings. To those who regularly practice yoga it might seem a bit basic, but the difference here is the awareness that is brought into the poses. Just because something is hard doesn’t always mean there is greater benefit. In fact, often times the simplest things can be the most powerful once we master them.
– Truth
Tone and Transform: Master the Five Tibetans yoga poses
By Susan L. Westbrook, Ph.D., | 5 Tibetans Workshop
—
Excerpted from The Five Tibetans Yoga Workshop: Tone Your Body and Transform Your Life by Susan L. Westbrook, Ph.D.
The rest poses
Between each set of each of the Five Tibetans you will move into a rest pose. The purpose of the rest pose is to regain the rhythm of your breath and to meditate on the mantra. In Hatha yoga, these are known as restorative poses. I will speak more about the rest poses as we move onward in the journey, but will include a short description of each one here.
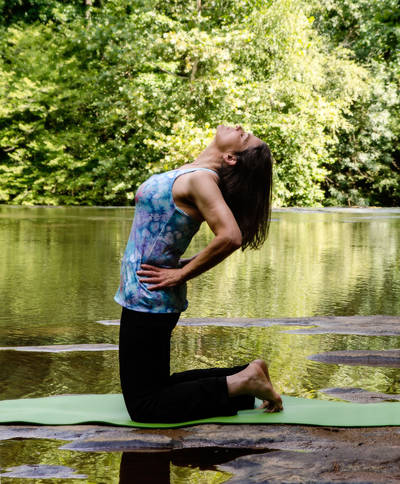
The First, Third, and Fifth Tibetans are followed by the Hatha yoga pose known as Child’s Pose. In Child’s Pose, you kneel on the mat, sit back on your feet and bend your torso over so that your chest is on your thighs or on the mat. You may choose to put your feet together and spread your knees towards the edges of the mat or to hold your legs parallel to one another.
When you first bend into the pose, put your arms out in front of your head and feel the stretch in your back and shoulders. When you are ready, pull your arms back along the sides of your body and let your forehead rest on the mat. You may rest your head on a pillow or a yoga block if your head does not easily reach the floor. Allow your hands to relax and your palms to face upward.
Breathe deeply as you hold this pose. Notice your breathing and remain in the pose until your breath has become relaxed and rhythmic. As the parasympathetic nervous system kicks in, you may experience a slight sigh or shudder signaling that you have, indeed, achieved a state of relaxation.
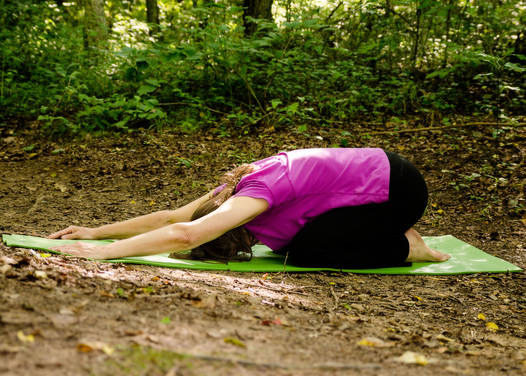
Child’s Pose
After the Second and Fourth Tibetans, you will rest in Corpse Pose. Lie on your back on the mat with your legs straight out and your feet eight to ten inches apart and relaxed, allowing the legs to roll open naturally. Your feet should be wide enough apart that your lower back releases. Your arms rest at your sides, palms up, hands a few inches from your body. If you have any discomfort in your back, place a bolster or a rolled blanket under your knees. Breathe deeply and rhythmically. The purpose of this pose in traditional yoga is to allow time and opportunity for renewal and rebirth, usually at the end of a yoga session. In the chapters that follow, I will encourage you to use this pose as a way to clear away any remaining thoughts or emotions that are not serving you.
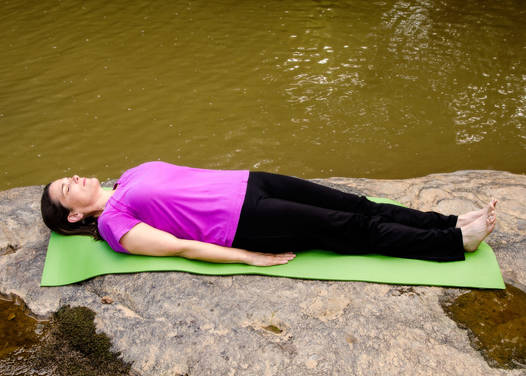
Corpse Pose
Corpse Pose is also an excellent pose in which to consciously practice taking and releasing a complete breath. To do this, draw in air through your nose while contracting down on your diaphragm, the muscular dome-shaped plate right beneath your ribcage. You will feel your lungs fill with air as your belly inflates in size. You can try that right now, as you sit here reading. Being a “belly conscious” society, we have a tendency to want to suck in our stomachs rather than to allow them to protrude. In order to breathe completely, you will need to permit yourself to let your belly become soft and large when you take in the breath. As your belly continues to enlarge, let the breath rise to expand your ribcage up and out to the sides. Finally, allow the breath to come up into your upper chest and throat. Now exhale by relaxing and allowing the breath to exit, leaving the belly flat and the ribcage contracted.
As you practice taking complete breaths, you may want to think of them as waves of breath that cause your belly to soften and inflate, your ribcage to extend up and out to the sides and your upper chest and throat to expand slightly. Soon you will notice that your breath flows naturally in this pattern and you may find yourself breathing this way even when you’re not engaging in your practice of the Five Tibetans.
The First Tibetan
The First Tibetan has a different character from the four that follow. It seems more like child’s play than a yoga pose. If you have ever seen the Whirling Dervishes of Sufi culture, you have a basic idea of the First Tibetan. In essence, the First Tibetan is a series of clockwise spins.
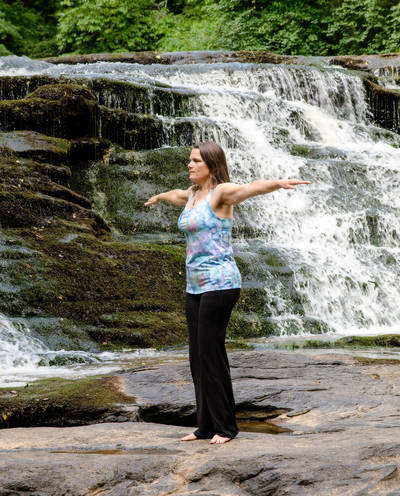
To begin the First Tibetan, you will stand up straight with your arms extended from your sides and parallel to the floor. Your palms will be facing down. You will move around in a clockwise direction, either pivoting on the balls of your feet or holding one heel in place. You will start with three spins and explore what works for you. Go slowly at first. You can build up speed as your tolerance increases. Rest in Child’s Pose after you have completed your spins.
First Tibetan
Breathing in the First Tibetan is apparently based on personal preference. Some teachers suggest holding your breath as you do the spins; others, me included, breathe with the spins. If I slow my process down and look at it more carefully, I realize I tend to inhale for two spins and exhale on the next two spins. The key to sticking with the Five Tibetans as a practice is in finding what works for you. Take time to experiment with how you feel in the spins and where the breathing seems most effective.
When you begin performing the First Tibetan, you may need to explore ways to reduce dizziness and nausea. The classic solution is to incorporate the technique used by dancers and skaters, i.e., to focus your eyes on a point in front of you and then snap your head around at the end. Another strategy is to keep your eyes on the hand that is leading the spin. What has worked best for me is to sight a point out in front of me in the beginning, go into the spin, and then let my eyes reconnect with the focal point each time I come back around to the starting point. I encourage you to remain curious and discover the way that best suits you. If you’re feeling dizzy after the spins, you can relieve the discomfort by placing your hands on your hips and breathing out hard as you bend forward. Two or three forceful exhalations will reduce the dizziness and nausea.
If you find that you cannot do the spins without feeling excessively dizzy, begin by standing in place and swaying your arms back and forth as you turn from side to side. As you build experience and confidence with the other poses, you can try the First Tibetan again. While the Five Tibetans are separate poses, they’re also impacting your body as a whole. With regular practice of the poses that you can do, you will find it easier to add in the poses that seemed difficult when you first set out.
The Second Tibetan
Those of you who will read or have read Peter Kelder’s book will note that he refers to the Second Tibetan as the “Fourth Rite.” The reason for this will be more apparent as we progress in the workshop, but I have reordered the sequence of the yogas to better address the Western mindset and to create a smooth flow through the chakras. This will not matter if you have not read other books on the Five Tibetans, but is a heads up for those of you with prior experience.
The Second Tibetan is similar to Reverse Table Pose in Hatha yoga. This is a pose that many people find particularly difficult. If it doesn’t come at first, play with alternatives and continue to practice the other poses. In time, you will find that you are able to perform the pose with greater ease.
You begin the Second Tibetan sitting upright on the mat, with your legs stretched out in front of you and your hands at your sides, palms on the floor. As you inhale, bring your hips up while keeping your feet flat on the mat. Your head should go back as far as is comfortable, but you should not overextend the neck. Once in the pose, your head, torso, and thighs will create a table-like surface. You will exhale as you move your hips back down and assume your original sitting position. Rest in Corpse Pose after you complete your repetitions of the Second Tibetan.
Second Tibetan
The Second Tibetan will help you build core strength and stamina. It may take a few weeks to get there. If you have injuries to your shoulders or back, be very careful as you proceed. If you feel any pain or discomfort in your wrists, shift your hand position. Try angling your hands away from your body and involving your fingers more in the lift. Spread your fingers and press into your finger pads and the mounds at the base of your fingers (knuckle pads). This action of engaging your fingers will protect your wrists. There are also several alternative body postures for this pose. If you’re able to make it up into the “table” part, but it seems awkward or strenuous, place a yoga block or rolled towel under your hands. It might be that you need more arm length. If getting your hips off the mat seems impossible, move your feet in two or three inches towards your hips, lift your hips off the mat, and then swing back down to sitting. If even that seems too much, push your chest out and up as you inhale and move your chest back down as you exhale. Only do what is comfortable for you. Only extend yourself as far as seems physically and emotionally safe.
When I first began doing this pose, I did not understand why some people found it so difficult. I arose into it easily. While I was writing this book, however, I experienced a shoulder injury. The pain of doing the Second Tibetan brought tears to my eyes when I lay down in the rest pose afterwards. I found myself dreading the pose. I also discovered that my discomfort with this pose influenced my enthusiasm for the other poses. In time, my shoulder healed and I was once again able to fully engage in the practice. It was a good lesson on many levels. If you have shoulder injuries, I encourage you to keep working with this pose. Find a way to keep it safely in your repertoire. As we will see in Chapter 2, the shoulders are linked to the heart chakra. It is possible, then, that a sore shoulder is speaking to you about an issue of the heart.
The Third Tibetan
A teacher once referred to the Third Tibetan as a “chiropractor’s dream.” While that might tend to scare you away, what I want to do is encourage you to be attentive and mindful as you perform this pose. The Third Tibetan is somewhat similar to Camel Pose in Hatha yoga. It’s the pose that appears on the cover of Christopher Kilham’s book, The Five Tibetans, and likely the one that creates angst in the mind of the beholder. I will teach you the Third Tibetan as I was taught to do the pose. You will find another rendition of this pose in Kelder’s book.
Third Tibetan
You will begin the Third Tibetan from a kneeling position on your mat. You may choose to lay the tops of your feet on the mat or tuck your toes under, so that your feet are up off the surface. The starting position for the pose is to hold an erect spine and to rest your chin on your chest. Place your hands on your hips, with your thumbs resting lightly on the two divots on either side of the spine. (You will form “wings” with your arms, as my friend and dedicated Five Tibetan Workshop participant Maggie says.) By positioning your hands on your back in this way, you have created additional support for your lower back.
You will start the pose by inhaling and letting your elbows guide you backward. Please note that this means you will be leading with your arms and not with your head. As your arms go back, your chest will open and your heart will move upward. You will only extend back as far as is comfortable. (Do not go all the way back, as you would in Camel Pose.) Keep your thighs as straight (vertically) as possible as you arch your back.
When you are ready, you will exhale as you carefully come back up into the starting position. Again, lead with your “wings,” and not with your neck. Bring your heart forward, not your head, so there’s no snapping the neck back into place. The restorative pose for Third Tibetan is Child’s Pose.
The Fourth Tibetan
Several of my clients find the Fourth Tibetan to be their favourite. Don’t let that fool you! You’ll build core strength doing this pose. To begin the Fourth Tibetan, lie flat on your back on your mat with your legs stretched out, feet together, arms along your sides and palms flat on the floor. On the inhalation, raise your head and torso and then raise your legs straight up into the air. Keep your legs straight and flex your feet by pointing your heels at the ceiling.You can extend the pose beyond 90 degrees, if that’s comfortable for you. When you’re ready to unfold, you will exhale and bring your head and feet back to the mat at the same time. Move into Corpse Pose to rest.
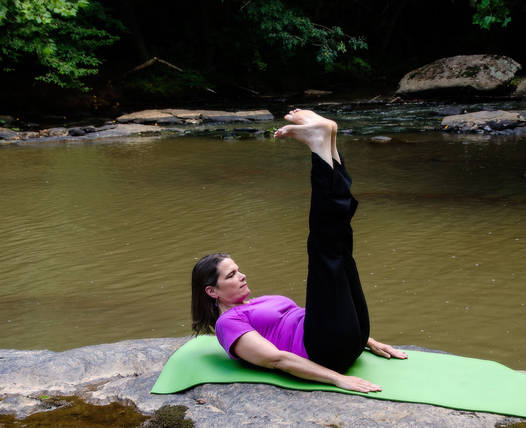
Fourth Tibetan
I make a modification to this pose when I do it in my practice. I place my hands (palms down) under the top of my hips to provide more support. You could also add a pillow or a blanket roll. I use this variation when I teach the Five Tibetans to decrease the likelihood of an injury or strain to the lower back.
The Fifth Tibetan
If I have a favourite Tibetan, it’s the Fifth. This pose is a blend of two Hatha yoga poses: Upward-Facing Dog and Downward-Facing Dog. The Fifth Tibetan strengthens the arms, wrists and back. Horsley contends that it reduces fat in the abdominals as well. (I’m still waiting for that to happen.) The Fifth Tibetan is a rigorous, but pleasurable, end to the sequence.
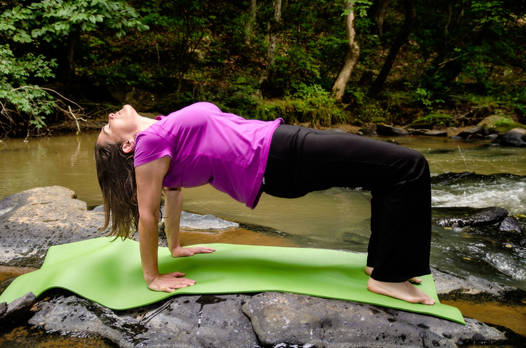
I begin the Fifth Tibetan on my hands and knees. I say “I begin” because other teachers may have you begin on your stomach and push up into the Upward-Facing Dog Pose to start or initiate the pose. Beginning on my hands and knees puts me in position for the mantra for the Fifth Tibetan. From the hands-and-knees start, stretch out your legs behind you and place your feet hip distance apart, toes tucked. Let your body relax and sag in between your arms, and let your head and back arch backward (to a comfortable place).
In the beginning you may wish to let your thighs and knees rest on the mat. When you’re feeling stronger, you can hold your legs off the mat. From the “sag,” you will inhale and use your shoulders and upper back to help you lift your buttocks into the air and stand up on your toes.
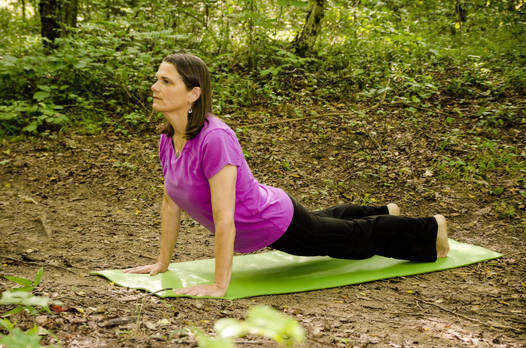
Fifth Tibetan, Step 1
Your hands and feet will remain in their starting place. As you move into the pose you’ll fold your head inward between your arms until your chin is tucked on your chest. You’ll resemble an inverted V at this point. When you’re ready to unfold, you’ll exhale and return to the start position, allowing your head and back to arch slightly. Recover by moving into Child’s Pose.
There are varying perspectives on whether your heels should be down (as in a traditional Downward-Facing Dog Pose) or up. The original drawings in Kelder’s books show the heels down. In Chakra Workout, Mary Horsley specifies that the heels should be up. Try both ways and determine which has the greatest impact on you. I began by using Kelder’s rendition and now integrate Horsley’s modelling of the pose in my practice. I can feel the difference in the extension of the buttocks and hamstrings.
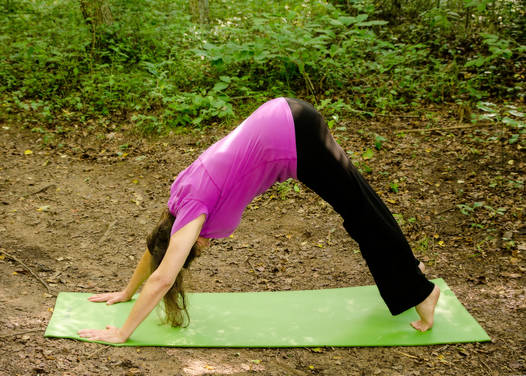
Fifth Tibetan, Step 2
Creating your practice
There’s no right way to begin practicing the Five Tibetans. I suggest a 12-week scenario in order to parallel the contents of this book, but the best practice is the one that works for you. Keep in mind that there are two reasons for creating your daily practice: to benefit physically from the daily execution of the poses and to transform your thinking through contemplation of the mantras. Each of those activities is an essential part of the process.
Susan L. Westbrook, Ph.D., was a professor and educational professional for more than 25 years before dramatically changing direction to become a high ropes facilitator, a life coach, and a Reiki master and teacher. Find out more about her book by visiting www.5tibetansworkshop.com orwww.findhornpress.com.
Extract reprinted by permission of Findhorn Press.
")
")


Mirdad
August 17, 2014
The 5 Tibetans (5T) is a powerful-wonderful methode.
Which is originally without the “rest/child poses”, plus, actually – thanks God, – it’s not a yoga… Pelder Kelder’s original book’s title was: “The Five Tibetan Rites”
It’s far beyond any fitness, or today’s polular eastern-western eso-woodoo.
IT JUST WORKS. Purely.